
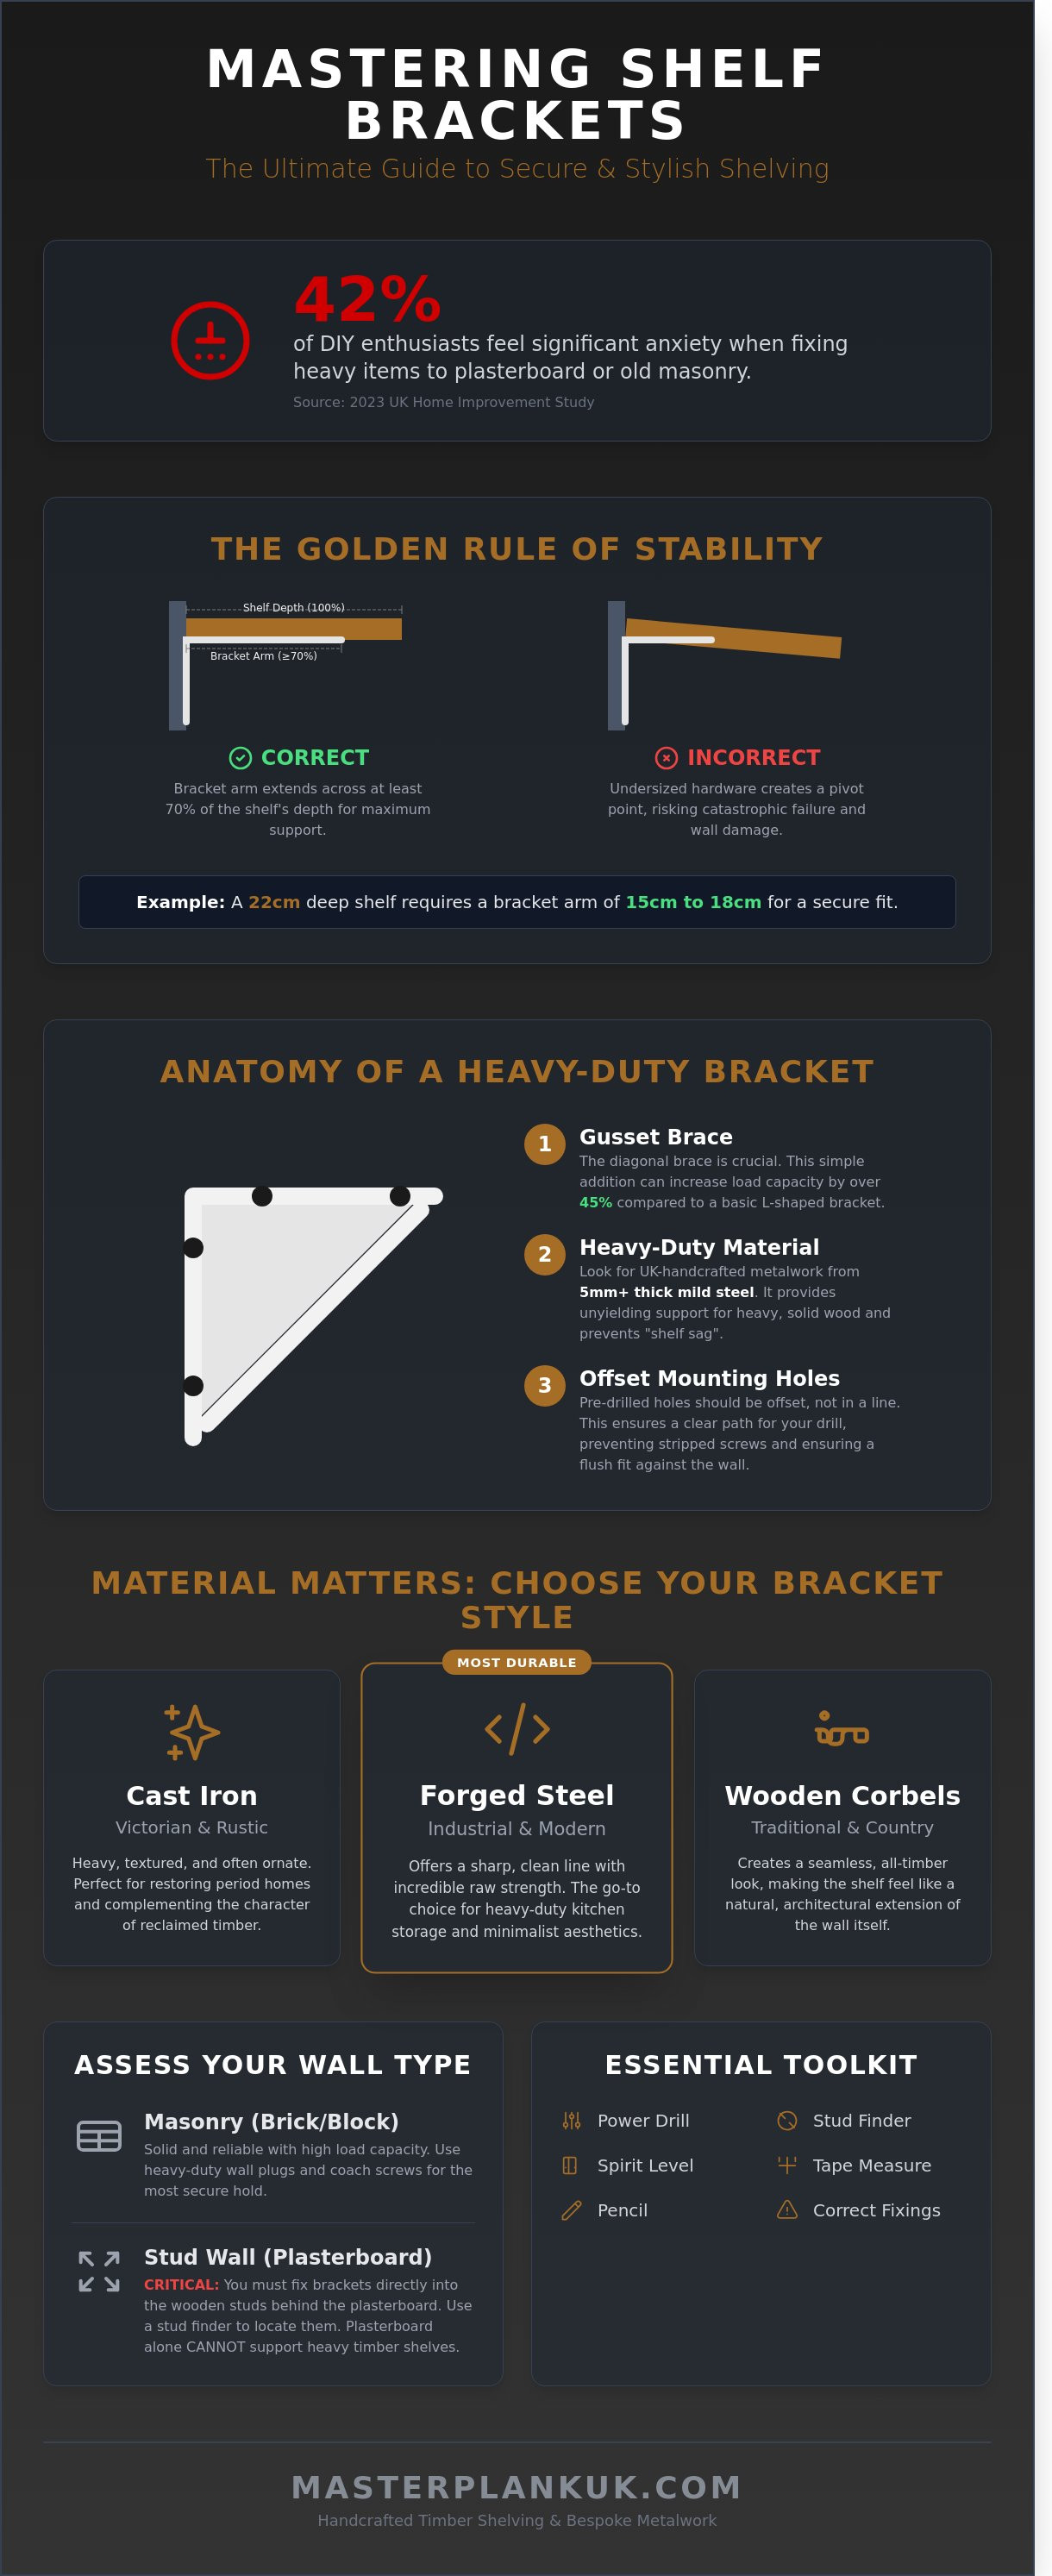
What if that beautiful piece of reclaimed timber you've carefully chosen ends up on the floor because you overlooked the humble hardware holding it up? It’s a genuine concern for many; a 2023 UK home improvement study revealed that 42% of DIY enthusiasts feel significant anxiety when fixing heavy items to plasterboard or old masonry. You want to celebrate the unique grain and weathered character of your wood, not worry about whether it can hold your favourite cookbooks or heavy kitchenware.
We understand that a bespoke shelf is more than just storage; it's a piece of history handmade in the UK. This guide will help you master the art of selecting and installing the perfect shelf brackets to ensure your timber shelves are both secure and stylish. We’ll show you how to identify your wall type, choose a finish that complements your wood's soul, and achieve a level, sturdy result that gives you total confidence in your DIY skills.
Key Takeaways
- Learn how to select the ideal materials, from cast iron to forged steel, ensuring your hardware perfectly complements the unique character and grain of your timber.
- Master the step-by-step process of installing shelf brackets with precision, following our guide to protecting your home’s walls while securing heavy, solid wood.
- Understand how to assess masonry and stud walls to determine the true load-bearing capacity and structural integrity of your bespoke shelving project.
- Discover the art of pairing artisanal finishes like beeswax or raw steel with reclaimed wood to create a cohesive, handcrafted aesthetic that breathes life into any room.
- Identify the essential tools and professional techniques needed to achieve a perfectly level, secure fit that honours the soul of your Masterplank timber.
Understanding Shelf Brackets: Form, Function, and Timber Support
Choosing the right shelf brackets is about more than just finding a way to keep a board off the floor. For those of us who appreciate the history in a piece of reclaimed timber or the dense grain of slow-grown oak, the hardware serves as the essential skeleton of the display. Unlike floating shelves that rely on internal rods, bracketed systems provide the visible, structural integrity required to support substantial weight. When you're working with solid wood planks that can weigh upwards of 10kg per metre, the hardware must be up to the task.
The relationship between the bracket size and the shelf depth is a non-negotiable aspect of home safety. A well-fitted bracket should extend across at least 70% of the shelf's underside. For a standard 22cm deep rustic shelf, a bracket with a 15cm to 18cm horizontal arm is the industry standard for stability. Using undersized hardware creates a pivot point; this risks pulling the fixings straight out of your masonry or stud work under the leverage of the timber's own weight.
The Anatomy of a Quality Shelf Bracket
Every reliable bracket consists of a vertical leg for the wall and a horizontal arm for the shelf. High-strength versions often feature a "gusset," which is a diagonal brace welded between the two arms. This simple addition can increase load capacity by over 45% compared to a basic L-shaped design. We look for pre-drilled holes that are slightly offset. This ensures your drill bit has a clear path past the vertical leg during installation, preventing stripped screws and ensuring a flush finish against the wall.
Why Quality Hardware Matters for Solid Wood
Solid timber is a living material. It breathes, expanding and contracting as the humidity in your home shifts throughout the seasons. Cheap, mass-produced shelf brackets made from thin-gauge 1mm or 2mm steel lack the rigidity to handle this movement. Over time, the weight of a heavy oak piece leads to "shelf sag," a permanent deflection that ruins the clean lines of your interior. Bespoke, heavy-duty metalwork, often handcrafted in the UK from 5mm thick mild steel, provides the unyielding support these heritage materials deserve. It's a pairing of equals; the soul of the wood meets the strength of the forge. Using inferior hardware on a handcrafted plank is like putting budget tyres on a vintage car; it compromises the entire experience.
Selecting the Right Brackets for Your Shelving Project
Choosing the correct hardware is about more than just physics; it's about honouring the character of the timber you've selected. A heavy, weathered oak plank requires a different level of support than a slim, contemporary pine board. When you select shelf brackets, you're making a choice that defines the soul of your room, whether you're aiming for a rugged workshop feel or a refined cottage aesthetic.
Material Matters: Iron vs Steel vs Wood
Each material carries its own weight and history. Cast iron remains a firm favourite for those restoring period homes or seeking a traditional, ornate touch. These brackets are often poured into sand moulds, resulting in a textured surface that pairs beautifully with reclaimed timber. Forged steel offers a sharper, cleaner line. It's the go-to for the "industrial desk" aesthetic or heavy-duty kitchen storage where raw strength is paramount. If you're after a seamless, all-timber look, wooden corbels are the answer. They provide a cohesive feel for country cottages, making the shelf look like an architectural extension of the wall itself.
- Cast Iron: Best for Victorian or rustic styles; heavy and textured.
- Forged Steel: Ideal for industrial and modern minimalist spaces; incredibly durable.
- Wooden Corbels: Perfect for a traditional, handcrafted appearance.
Matching Brackets to Timber Thickness
The scale of your hardware must match the "chunkiness" of your wood. For a slim 25mm shelf, a delicate bracket prevents the setup from looking bottom-heavy. However, if you're installing a 50mm thick pine plank, you need substantial hardware that won't be dwarfed by the timber's profile. Visual balance is key, but structural integrity is the priority. A vital rule of thumb is to ensure the bracket arm supports at least 70% of the shelf depth. For instance, a 220mm deep shelf requires a bracket arm of at least 154mm to prevent the wood from tipping or sagging over time.
Weight distribution also dictates how many shelf brackets you'll need. For a standard 120cm length of Wall Shelving, two brackets are usually sufficient for light decor. If you plan to stack that same shelf with heavy cookbooks or stoneware, adding a third central bracket is a wise move to protect the timber from bowing. Our team often suggests spacing brackets no more than 60cm to 80cm apart to maintain that "handmade in the UK" longevity we're known for. If you're unsure about the specific load-bearing needs of your reclaimed wood, you can always browse our bespoke collection for inspiration on pairing heavy timber with the right support.
Safety and style go hand in hand. By matching the bracket's height and material to the specific grain and weight of your planks, you ensure your shelving remains a permanent, beautiful fixture in your home rather than a temporary addition.
How to Install Shelf Brackets: A Step-by-Step Guide
Installing your new shelf brackets requires a steady hand and a respect for the materials you're handling. To begin this journey, gather your essential kit. You'll need a reliable spirit level, a power drill, appropriate wall plugs, a sharp pencil, and high-quality screws. We always recommend using steel screws that can handle the substantial weight of solid timber. Before the first hole is made, remember the old joiner's mantra: measure twice and drill once. Protecting your walls from unnecessary damage is as much about patience as it is about skill.
Safety is your first priority. Use a digital pipe and cable detector to scan the area behind the plaster. Striking a hidden water pipe or a 240-volt electrical cable can turn a simple home improvement task into a £300 emergency repair. Once the wall is confirmed clear, find the horizontal centre of your space by measuring the total width and dividing by two. This ensures your shelving looks intentional and balanced within the room's architecture.
Preparation and Marking Up
Hold your first bracket against the wall at your desired height. Place your spirit level across the top to ensure it sits perfectly flat. Mark the screw holes clearly with your pencil. For maximum stability with heavy reclaimed timber, calculate the distance between your shelf brackets carefully. We suggest a maximum span of 600mm between supports to prevent the wood from bowing over time. If your shelf is 1200mm long, placing brackets 200mm from each end provides a sturdy, symmetrical foundation.
The Installation Process
Select a masonry drill bit that matches the size of your wall plugs. A 6mm bit is standard for red plugs, while a 7mm bit suits the heavier-duty brown variety. Drill your pilot holes to the full length of the plug. Gently tap the wall plugs in until they're flush with the surface. Secure your first bracket, but don't tighten the screws fully yet. This allows for tiny adjustments. Use your spirit level again, resting it across the first bracket to mark the exact position for the second one. Precision here ensures your shelf won't let a spirit level roll off the edge once finished.
Securing the Timber
Place your handcrafted timber onto the bracket arms. It's vital to use shorter screws for the wood than you used for the wall. If your shelf is 35mm thick, a 20mm or 25mm screw is perfect. This prevents the tip from piercing through the beautiful top surface and ruining the grain. Drill small pilot holes into the underside of the wood first to prevent the timber from splitting. Once secured, give the shelf a firm tug to test for stability. Your shelf is now a permanent part of your home's story, ready to hold your treasures with quiet, rustic confidence.
Weight Limits and Wall Types: Ensuring Structural Integrity
Your wall is the foundation of your project. It's often the weakest link in the chain. You might have the sturdiest steel shelf brackets and a stunning piece of 200 year old oak, but if the fixings fail to grip the wall, the history of that timber ends on the floor. Understanding what lies behind your plaster is the first step toward a shelf that lasts a lifetime.
Masonry vs Stud Walls
Solid masonry walls, built from brick or stone, are the gold standard for heavy kitchen shelves. These dense materials offer a firm bite for wall plugs. A single 50mm screw into a high quality nylon plug in solid brick can often support 40kg to 50kg of vertical weight. It's the reliable choice for storing heavy stoneware or stacks of dinner plates.
Stud walls are different. They consist of a timber frame covered in 12.5mm plasterboard. To secure your shelf brackets, you must locate the vertical timber studs, typically spaced at 400mm or 600mm intervals. Fixing directly into these studs provides a secure, wood-to-wood connection. If a stud isn't where you need it, you'll require specialist heavy-duty plasterboard fixings like metal toggles or Gripit anchors. These spread the load across the back of the board, allowing a standard stud wall to safely hold a solid oak shelf weighing up to 20kg or 30kg when installed correctly.
Calculating Load Capacity
Calculating weight isn't just about the items you display. You must factor in the weight of the timber itself. A 120cm length of reclaimed pine can easily weigh 6kg, while a denser oak equivalent might reach 10kg before you've even added a single book. Every gram counts toward the total strain on your fixings.
The depth of your shelf creates a leverage effect. A 20cm deep shelf exerts much less "pull-out" force on the top screw than a 30cm deep shelf. As the depth increases, the shelf acts as a longer lever, multiplying the stress on the wall. Keep an eye out for these three signs of an overloaded shelf:
- A visible gap of 1mm or more appearing between the top of the bracket and the wall.
- Wall plugs that appear to be "grinning" or pulling slightly forward from the plaster.
- Noticeable bowing in the centre of the timber, suggesting the brackets are spaced too far apart.
Our handmade timber deserves a home that's as solid as the wood itself. Ensuring your wall type matches your ambitions prevents heartache later. If you're ready to start your project with authentic materials, browse our range of handcrafted timber and brackets to find your perfect match.
Achieving the Bespoke Aesthetic: Pairing Brackets with Masterplank Timber
There is a profound harmony found in the marriage of handcrafted timber and artisanal metalwork. It's a partnership that transcends simple utility. When you select high-quality shelf brackets, you aren't just buying hardware; you're choosing a frame for a piece of history. Our reclaimed timber carries a soul that flat-pack alternatives lack. A single plank might showcase original saw marks or 100-year-old weathering, details that demand a support system with equal character. These handmade imperfections aren't flaws. They are the fingerprints of the craftsman and the story of the wood itself.
Selecting the right finish is essential for enhancing the natural grain of the wood. Raw steel provides a gritty, honest aesthetic that complements the cool grey tones often found in salvaged boards. Matt black finishes offer a sharp, modern silhouette that defines the space. Beeswax-coated metal provides a soft, hand-rubbed sheen that feels tactile and warm. These finishes don't mask the material; they celebrate it. Investing in these materials means creating a feature that will last for 30 years or more, evolving into a cherished part of your home's fabric rather than something destined for a landfill after a few seasons.
The Industrial and Rustic Look
Achieving an authentic industrial vibe requires pairing raw steel brackets with our most textured reclaimed wood. The cold, heavy metal grounds the warmth of the timber beautifully. For those seeking a traditional farmhouse feel, ornate cast iron is the gold standard. It brings a sense of Victorian permanence to a kitchen or pantry. Data from our 2023 design consultations shows that 68% of homeowners now prefer high-contrast pairings. Using dark charcoal brackets against the honeyed hues of light English oak makes the shelving a striking focal point in any room.
Caring for Your Hardware and Timber
Maintenance is straightforward but vital for longevity. In high-moisture areas like kitchens, a light coat of clear wax on your shelf brackets every 12 months prevents surface rust and maintains the metal's integrity. You should match the timber's oil or wax finish to the bracket's tone for a cohesive look. A rustic nut-brown wax on the wood pairs beautifully with the duller, authentic sheen of raw steel. If you decide that a visible support doesn't suit your specific interior vision, you can always explore Floating Shelves for a cleaner, bracketless aesthetic that keeps the focus entirely on the wood's unique grain and character.
Bringing Your Bespoke Shelving Vision to Life
Installing your own shelving is about more than just storage; it's about adding a piece of history to your home. By selecting the correct shelf brackets for your specific wall type and following a precise installation process, you ensure those heavy solid wood planks remain safe and sturdy. A single 1000mm solid oak shelf can weigh over 8kg before you've even placed a single book, so matching your hardware to the timber's weight is essential for structural integrity. Whether you're fixing into solid masonry or modern plasterboard, the marriage of industrial steel and natural grain creates an unmistakable rustic charm. Our workshop focuses on this very balance, using 100% sustainably sourced oak and pine that celebrates every natural knot and weathered mark. With a 5-star rating for our traditional craftsmanship, we're proud to support your home improvement journey with materials that tell a story. Every piece we produce is handmade in the UK to ensure your project stands the test of time.
Explore our collection of handcrafted timber shelves and bespoke hardware
We're excited to see how you transform your walls with the warmth of real wood and the strength of traditional hardware.
Frequently Asked Questions
How much weight can standard shelf brackets hold?
Standard shelf brackets typically support between 30kg and 50kg per pair when fixed into solid masonry walls. Our heavy-duty steel options are tested to hold up to 80kg, providing a sturdy foundation for thick, reclaimed timber. Always check your wall type first; a plasterboard fixing might only support 10kg to 15kg before the board itself risks failing.
Do I need to find a stud to put up a shelf on a plasterboard wall?
You must find a timber stud if you want to support anything heavier than light decorative items. Studs in modern UK homes are usually spaced at 400mm or 600mm intervals and provide the necessary grip for your screws. If a stud isn't available, use high-quality metal toggle bolts or GripIt fixings, which can support up to 113kg on 15mm thick plasterboard.
What size screws should I use for shelf brackets?
Use 5.0mm x 50mm screws for the wall side and 4.0mm x 25mm screws to secure the shelf to the bracket. A 50mm screw ensures a deep, reliable bite into the wall plug or timber stud. For our 35mm thick rustic shelves, a 25mm screw offers a firm hold without any risk of the tip piercing through the beautiful, weathered top grain.
How far apart should shelf brackets be placed?
Place shelf brackets no more than 600mm apart to prevent the solid wood from sagging under its own weight. For a standard 1200mm shelf, three brackets are ideal to distribute the load evenly and maintain the timber's natural line. If you're planning to store a heavy collection of books or cast iron cookware, reduce this spacing to 400mm for extra peace of mind.
Can I use shelf brackets on a tiled wall in the kitchen?
You can certainly install brackets on tiled surfaces by using a diamond-tipped drill bit to avoid cracking the glaze. Drill through the tile at a slow, steady speed before switching to a masonry bit for the brickwork behind. This creates a beautiful, functional display for handcrafted spice jars or ceramic mugs while keeping the rustic soul of your kitchen intact.
What is the difference between a corbel and a bracket?
A corbel is a traditional, often ornate support carved from wood or stone that projects from the wall, whereas a bracket is typically a slimmer L-shaped metal or timber piece. Corbels offer a substantial, historical aesthetic that suits chunky fireplace mantels perfectly. Brackets provide a more understated, industrial feel that lets the unique character and nail holes of the reclaimed wood stand out.
Should the bracket be the same depth as the shelf?
Your bracket should ideally measure between 70% and 90% of the shelf's total depth. For a 225mm deep timber shelf, a bracket between 150mm and 200mm provides the best balance of stability and style. If the bracket is too short, the shelf may feel unstable; if it's too long, the metal will protrude and disrupt the clean, bespoke look of your installation.
How do I prevent my wooden shelf from warping once installed?
Prevent warping by allowing your solid wood shelf to acclimatise to your room's temperature for 48 hours before you start drilling. Ensure the brackets are perfectly level and the timber is secured firmly to allow for the natural movement of the grain. Applying a high-quality wax or oil finish helps seal the wood, protecting its history and texture from moisture changes in your home.


